|
 |
Real Estate Blog
|
|
|
Friday, March 22 2013
Deep clean your house and you’ll brighten rooms and help maintain your home’s value.
Deep cleaning your house is that top-to-bottom, take-no-dust-bunny-prisoners, mother-in-law-quality cleaning that truly maintains the value of your home. Here are frequently overlooked areas that a little spit and polish wouldn’t hurt.
De-bug the light fixtures
See that bug burial ground within your overhead fixtures? Turn off the lights and carefully remove fixture covers, dump out flies and wash with hot soapy water. While you’re up there, dust bulbs. Dry everything thoroughly before replacing the cover.
Vacuum heat vents and registers
Dirt and dust build up in heat vents and along register blades. Vents also are great receptacles for coins and missing buttons. Unscrew vent covers from walls or pluck them from floors, remove foreign objects, and vacuum inside the vent. Clean grates with a damp cloth and screw back tightly.
Polish hardware
To deep clean brass door hinges, handles, and cabinet knobs, thoroughly wipe with a damp microfiber cloth, then polish with Wright’s or Weiman brass cleaner ($4). Dish soap shines up glass or stainless steel knobs. Use a Q-tip to detail the ornamental filigree on knobs and handles.
Replace grungy switch plates
Any amateur can wipe a few fingerprints off cover plates that hide light switches, electric outlets, phone jacks, and cable outlets. But only deep cleaners happily remove plates to vacuum and swipe the gunk behind. (OK, we’re a little OCD when it comes to dirt!) Make sure cover plates are straight when you replace them. And pitch plates that are beyond the help of even deep cleaning. New ones cost less than $2 each.
Neaten weather stripping
Peeling, drooping weather stripping on doors and windows makes rooms look old. If the strip still has some life, nail or glue it back. If it’s hopeless, cut out and replace sections, or just pull the whole thing off and start new. A 10-ft. roll of foam weather stripping costs $8; 16-ft. vinyl costs about $15.
Replace stove drip pans
Some drip pans are beyond the scrub brush. Replacing them costs about $3 each and instantly freshens your stove.
Read more: http://www.houselogic.com/home-advice/maintenance-repair/home-cleaning-secrets/#ixzz2O0mqzjb6
Friday, November 02 2012
Knowing how to evaluate, buy, and store firewood is key to the safe, efficient operation of your fireplace, wood stove, or fireplace insert.
Whether you burn fires as a supplemental heat source for your home or strictly for ambiance and pleasure, it’s important to know how to properly buy and store firewood. For homeowners looking to fuel a traditional masonry fireplace, fireplace insert, or wood stove, the goal should be the same: to get the best quality firewood for the best possible price.
Before picking up the phone, it’s important to know exactly what you want to purchase so that you can clearly express that to the wood seller, says Matt Galambos, a Maine arborist certified by the International Society of Arboriculture. This includes determining the quantity, species, and condition of the firewood, all of which affect its price.
How much to buy
Homeowners who intend to heat their homes through the use of a wood stove naturally will require more firewood than those who burn only the occasional fire for pleasure. A person living in the Northeastern U.S. who burns firewood as his or her primary heat source, for example, may require up to five cords of wood to get them through the season. In contrast, a weekend-only fire builder can likely get by on as little as a half-cord. Galambos estimates that for the casual but steady fire builder, one cord of wood should easily last through winter.
Measuring a cord of wood
A cord of wood is defined as a stack of cut firewood that measures 4 feet tall by 4 feet wide by 8 feet long, or any other arrangement that equals 128 cubic feet. The individual pieces must be stacked side by side rather than the looser crisscross style. Other measurement terms, such as ricks, racks, face cords and piles, have no legal meaning and are often banned by state weights and measurements agencies. Regardless what the load is called, says Galambos, it should always be converted to cords or fractions thereof so that homeowners can determine if they are getting a fair price.
Seasoning the wood
Freshly cut wood is composed largely of water. Not only is this “green” wood difficult to ignite, but burning it can lead to a dangerous buildup of creosote, the cause of chimney fires. Properly “seasoned” firewood is wood that has been cut to length, split, and allowed to air dry for at least six months until the moisture content dips to around 20%. Dry wood will appear grayish in color and the pieces will begin to exhibit splits and cracks on the ends. Compared to freshly cut wood, seasoned wood feels light for its size.
Though seasoned firewood is the only choice for immediate use, green wood shouldn’t be completely ignored, says Galambos. “If you have the room to store it and the time to dry it, buying green firewood can save you up to 25% compared with seasoned wood,” he says.
Hardwood vs. softwood
It’s a common misconception that burning soft woods, such as pine and cedar, leads to dangerous creosote buildup. As long as the firewood is properly seasoned, it can safely be burned in a fireplace or stove regardless of species, says Dr. John Ball, Professor of Forestry at South Dakota State University. But that doesn’t mean that all wood is created equal.
“Tree species differ widely in the amount of heat they produce when burned,” says Ball. Hardwoods like oak, maple, and madrone produce almost twice the heat compared with softer woods, such as spruce, pine, and basswood. Fires built with hardwood not only burn hotter, they last longer, meaning the wood pile won’t get depleted as fast. Homeowners can expect to pay a premium for 100% hardwood, but Ball cautions against purchasing cheaper “mixed-wood” loads that may contain little actual hardwood.
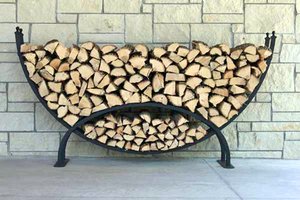
Storing firewood
Homeowners should consider storage long before the firewood delivery truck appears in the driveway, cautions Galambos. A cord of wood takes up a significant amount of space, and if not properly stored your investment will quickly begin to rot. Firewood that is not stowed in a protected space like a garage or shed needs to be six inches off the ground. Firewood racks or simple pallets work well. If exposed to the elements, the wood pile should be at least partially covered with a waterproof tarp. Experts caution against storing the wood too close to the house for fear of inviting pests.
Average prices
Homeowners can expect to pay $75 to $150 for a half-cord and between $150 and $350 for a cord of hardwood delivered and stacked. To save some money, a person with a large truck may elect to pick up his or her own load at the wood lot.
To verify the quantity, species, and condition of the firewood, it’s wise to arrange the delivery for a time when you’re home. Experts say, inspect the wood for type and condition before it’s unloaded, though quantity can only be accurately measured after it’s stacked.
Maximize your fireplace efficiency
It’s true that a traditional wood fireplace can never rival the energy efficiency of a wood stove or even a fireplace insert, but there are ways a homeowner can trim heat loss. Fire-resistant glass doors not only reduce the volume of heated home air that escapes up the chimney, they help radiate heat back into the room. Similarly, a thick cast-iron fireback is an old-fashioned device that absorbs and emits energy in the form of radiant heat. Check the fireplace damper for leaks and always tightly seal it when the fireplace is idle.
Read more: http://www.houselogic.com/home-advice/fireplaces-chimneys/buying-firewood/#ixzz2AzjlwPLk
Monday, October 22 2012
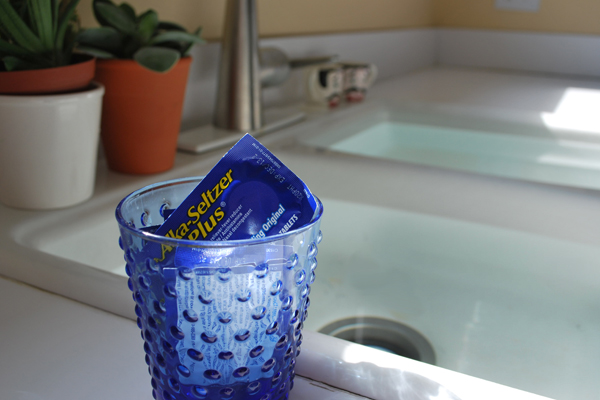
Unclog a drain by dropping three Alka-Seltzer tablets down the drain, followed by a cup of white vinegar. Image: Liz Foreman for HouseLogic
This month marks the 27th anniversary of the most influential DIY show ever. Nope we’re not talking about This Old House (which debuted in 1978). We’re referring to MacGyver, the action-adventure series that taught us any sticky situation could be fixed with a few mundane items.
To note this occasion, we asked four DIY experts to share their favorite MacGyver-inspired household hacks and tips.
Expert: MoneyCrashers.com
This penny-pinching site known for doling out smart budgeting advice came up with two quick fixes; one clears clogs while the second neatens up floors.
1. Unclog a drain
Solution: Next time one of your drains is being a pain, drop three Alka-Seltzer tablets down the sink followed by a cup of white vinegar.
We’re not 100% sure about the science behind this, but we heard when combined together, these ingredients will dissolve grease and other funky things. After about 15 minutes, you can clear the drain with boiling water.
Do not attempt this trick immediately after using a commercial drain opener like Drano or Liquid-Plumr.
FYI, you can also use this exact same solution to clean and freshen up toilet bowls.
Fun MacGyver fact: He mixed it with baking soda to create a smoke screen.
2. Fix scuffed floors
Give scuffmarks on tile and linoleum floors the boot using a tennis ball fitted on the end of a broom handle. When rubbed against the floor, the ball will remove scuffmarks.
What, you don’t have a tennis ball? Use a sneaker. The bottom of most clean sneakers can easily buff floors.
Fun MacGyver fact: He once made a missile out of a broom handle.
Expert: Domestic Imperfection
Ashley, the blogger behind this site, knows a thing or two about being crafty. Just like MacGyver, she likes hacking common office items.
Read more: http://www.houselogic.com/blog/repair-tips/macgyver-inspired-household-hacks/#ixzz2A2lA7DmS
Friday, October 19 2012
Are you haunted by strange noises and weird odors? With the proper maintenance, you’ve got more than a ghost of a chance to rest easy.
Creaking and popping in the night
The many materials that make up your house — wood framing, plywood, glass, metal ducts, nails, plumbing pipes — all expand and contract at different rates.
When a house cools at night, these materials may move slightly, rubbing against each other and making noises. Occasionally, they’ll contract with an audible pop.
These sounds tend to be more noticeable in fall, when warm days give way to rapidly cooling nights. The bad news? Not much you can do about it. The good news? Those sounds are harmless and normal.
Zombie odor
It’s either time to throw out the garbage, or you’d better call your gas utility to check on your gas lines and connections.
Natural gas is odorless, but natural gas suppliers add a foul-smelling odorant — butyl mercaptan — to alert occupants to any leaks. The smell is like rotten eggs.
Leaks can occur at your gas-fired water heater, fireplace, clothes dryer, and any gas line. Leaking natural gas is potentially dangerous — leave the house and call your natural gas provider to assess the situation. Most utility companies perform safety checks for free.
Footsteps in the attic
Amplified by an unfinished attic space, a raccoon or even a good-size squirrel on your roof might sound like an ax murderer is doing the polka overhead.
These rooftop transits are normal for critters — roofs offer a nice long unobstructed highway.
Make sure your soffit, rafter, and gable roof vents are covered with screens and in good shape, or your rooftop buddies might find their way into your attic for real. Trim back branches that provide critters easy access to your roof.
Something’s burning
You can smell the odor of burnt wood, but the smoke detectors aren’t going off and there’s no smoke in the house. The culprit could be your fireplace — even if you haven’t had a fire for days.
The probable cause is a drafty chimney and negative air pressure in your home, meaning that outside air is infiltrating down your chimney, bringing stale burnt smells with it.
Stop drafts by making sure your damper has a good seal. Regulate air pressure by adding more cold air return ducts to your HVAC system. You’ll get rid of the odor and save on your energy bill, too.
Moaning and clattering
These classic spooky sounds often show up when the wind blows and there’s a storm brewing.
Vents for clothes dryers, bathrooms, and water heaters exit out the roof or the side of the house. To prevent backdrafts, these vents have dampers — flaps designed to let vented air out and prevent outside air from coming in. These flaps sometimes move and rattle in high winds.
Because dampers often are located in attics or in between floor joists, the sound can be difficult to pinpoint. You may need a new damper ($85).
Source: http://www.houselogic.com/home-advice/maintenance-repair/spooky-house-noises-bad-smells/#ixzz29ZfTASQD
Thursday, July 26 2012
You change your car's oil every 3,000 miles or so, get your teeth cleaned regularly, and rebalance your investments once a year. So why wouldn't you undertake similar preventive maintenance on your house?
Having to replace just one of its hardest-working surfaces -- from roofing to exterior paint, hardwood floors to lawn -- would cost you thousands. But you can stave off that pain with simple, often-overlooked upkeep procedures and slight tweaks to the way you already approach routine chores.
Exterior paint: The biggest controllable threat to the paint on your house is the landscaping around it, says architect Karen Sweeney, director of facilities for two Frank Lloyd Wright buildings in Chicago.
Overgrown foundation plantings rub away paint -- and bring moisture and bugs onto the finish.
The fix: Prune bushes to keep them at least a foot away from the house; a landscaper might do it for $200 if he's already there.
Roofing: You can't stop nature from damaging your roof, but you can address the harm coming from within by adding ventilation to your attic. Without proper airflow, that space can get 35° to 55°F hotter than the outside temperature, roasting the roof from below.
The fix: Have a contractor add airflow by installing high and low attic vents; they can go in the walls or the roof itself, depending on the situation ($500 to $1,000).
Hardwood floors: Every grimy boot and dragged chair brings you closer to the day when you'll have to refinish the floors. "But sanding floorboards makes them a little thinner, bouncier, and creakier," says Sweeney. "And after three times there's nothing left to sand."
The fix: Hire a floor guy to "
But in the North, grass shorter than 2½ to 3½ inches is less drought resistant and invites insects and weeds (in the South, one inch is fine).
The fix: Set the mower higher and never remove more than a third of the grass height at a time. Says Stier: "Think of mowing as a trim, not a crewcut."
," or sand away most of the old finish -- without touching the wood -- and apply new polyurethane ($1,000 to $1,500 for a typical first floor, half the cost of refinishing).
Lawns: Many DIYers and pros do the grass serious harm when they mow.
"People like the look of a close-cropped lawn," says University of Tennessee agriculture professor John Stier, a consultant to Major League Baseball grounds crews.
Source: http://money.cnn.com//2012/07/17/real_estate/home-repair.moneymag/index.htm?section=money_realestate&utm_source=feedburner&utm_medium=feed&utm_campaign=Feed%3A+rss%2Fmoney_realestate+%28Real+Estate%29
Friday, March 09 2012
Electric fireplaces are cheap and easy ways to spark a little somethin’ on a cold winter night. Just plug and play. Here’s how they work.
Sparking the mood for love in the bedroom — or any room — is easier than you think with an electric fireplace that ignites romance without a complicated install, high price, or frilly lingerie.
Electric fireplaces have become the fastest-growing segment of the fireplace market. That’s because new technology makes flames look and feel real. Coils and blowers give off enough heat (4,600 to 5,000 BTUs) to warm 400 sq. ft., and add-ons provide the snap and crackle of a real wood fire for as little as $300.
In fact, if you don’t have the budget or structure to support adding a fireplace fueled by wood or gas, you easily can light up with an electric fireplace, which doesn’t need to be vented or surrounded by noncombustible material. In fact, the only thing you need is a 120V outlet.
You can even buy fireplaces-to-go on casters that let you wheel them throughout the house. And if you’ve got money to burn, you can buy elaborate mantle packages that boost the price to $2,000. You can buy electric fireplaces at big-box stores and fireplace specialty stores.
But even with all the bells and whistles, you won’t be spending near the $7,000 that a comparable gas fireplace would cost to install.
With those savings, you can buy some champagne and get something waxed. (There’s only so much a fireplace can do.)
Read more: http://www.houselogic.com/blog/fireplaces-chimneys/fake-fire-portable-electric-fireplace/#ixzz1oSdf6ZgF
Monday, November 21 2011
Repair wood floors and scratches that make rooms look worn out. We’ll show you easy ways to put the luster back into your floors.
Dogs chase kids, pans drop, chairs scrape, and soon you must repair wood floors and erase scratches that make a mess of your red oak or Brazilian cherry. A professional floor refinisher will charge $1 to $4 per sq. ft. to apply a new coat of finish. No worries. We’ve got inexpensive ways to remove wood scratches and repair deep gouges in a few easy steps.
Camouflage scratches
Take some artistic license to hide minor scratches in wood floors by rubbing on stain-matching crayons and Sharpie pens. Wax sticks, such as Minwax Stain Markers, are great scratch busters because they include stain and urethane, which protects the floor’s finish.
Don’t be afraid to mix a couple of colors together to get a good match. And don’t sweat if the color is a little off. Real hardwoods mix several hues and tones. So long as you cover the contrasting “white” scratches, color imperfections will match perfectly.
Homemade polish
Mix equal parts olive oil and vinegar, which work together to remove dirt, moisturize, and shine wood. Pour a little directly onto the scratch. Let the polish soak in for 24 hours, then wipe off. Repeat until the scratch disappears.
Spot-sand deep scratches
It takes time to repair wood gouges: Sand, fill, sand again, stain, and seal. Here are some tips to make the job go faster.
- Sand with fine-gauge steel wool or lightweight sandpaper.
- Always sand with the grain.
- Use wood filler, which takes stain better than wood putty.
- Use a plastic putty knife to avoid more scratches.
- Seal the area with polyurethane, or whatever product was used on the floor originally.
Fix gaps in floor
Old floorboards can separate over time. Fill the gaps with colored wood putty. Or, if you have some leftover planks, rip a narrow band and glue it into the gap.
Read more: http://www.houselogic.com/home-advice/repair-tips/repair-wood-floors-and-erase-ugly-scratches/#ixzz1e5XbHSvr
Tuesday, November 15 2011
Tankless water heaters cut energy bills but aren’t the right choice for everyone. Here’s how to figure out if going tankless makes sense for you.
If you’re a hot water multitasker who washes clothes, dishes, and yourself at the same time, a low-capacity tankless water heater could serve you a “cold water sandwich” or leave you high and dry. But tankless water heaters, which heat water only on demand, are more energy-efficient than traditional water heaters, which warm water whether you need it or not. What’s the best way for you to get into hot water? Read on.
Traditional vs. tankless water heater
Traditional hot water heaters typically live in your basement and provide gallons of hot water at one time: an 80-gallon tank heats enough water to shower, run a dishwasher, and do a load of laundry simultaneously. But standby energy loss is significant with hot water heaters, and once you’ve exhausted the hot water supply, you’ll wait 20 to 60 minutes for the heater to cook up more.
A tankless water heater produces hot water only when you need it. When you turn on the faucet, water is heated on the spot as it flows through capillary-like pipes heated by either a powerful gas burner or electric coils. (There are no oil-fired on-demand water heaters on the market.)
Gush to a trickle
Although a tankless water heater can pump hot water all day, it can’t produce a large amount all at once. And it can snap you out of a hot shower bliss with the “cold water sandwich effect,” a sudden splash of cold water that results from turning the hot water faucet on and off repeatedly.
A traditional tank heater puts out 7.5 to 9.5 gallons of water per minute (GPM), enough to shower, run the dishwasher, and do a load of laundry all at the same time. The typical tankless water heater, however, puts out only 2.5 to 5 GPM, enough to handle only two uses at a time.
Be warned: Not all flow rates are calculated the same. Energy Star measures GPM based on a 77-degree increase in water temperature for the incoming supply, while some companies list their GPM flows at 35- and 45-degree rises. The more heat the water requires to reach the desired temperature, the slower the flow rate.
High upfront costs
A gas-fired tankless water heater system costs $1,500 to buy and install, nearly double the price of a conventional gas water heater, and $575 more than a high-efficiency tank model. In addition, while a conventional water heater typically uses a half-inch gas line, a tankless water heater requires three-quarter-inch pipe. That plumbing change costs from $25 to $40 a foot, potentially adding many hundreds to initial costs.
On the bright side, your new energy-efficient unit may qualify for a federal tax credit of up to $300 on purchase and installation through 2011.
An electric tankless water heater costs as little as $400 installed. But it doesn’t qualify for a tax credit because it is less efficient than gas and is better suited for point-of-use applications, such as instant kitchen hot water, rather than a whole-house system.
Installing multiple units
One solution to the limited output problem is to install multiple on-demand units. Because it’s small—about the size of a carry-on suitcase—you can place a tankless water heater along any stretch of pipe—in the attic, basement, closet, or crawlspace. You can install two or three units to serve different parts of the house, or even dedicate a unit for a particular use, say a washing machine.
Multiple on-demand units increase overall energy efficiency. By bringing hot water close to where it’s needed, you reduce energy loss and increase efficiency by 50% over a conventional hot water tank system, about $165 in annual savings for an average household.
Energy and money savings
- According to the U.S. Dept. of Energy, a tankless water heater is more efficient and uses less energy than a conventional water heater, providing a $25 to $107 in annual savings.
- If your hot water use is low (less than 41 gallons per day), a tankless water heater will be 24% to 34% more efficient.
- If your hot water usage is high (about 86 gallons per day), a tankless water heater is 8% to 14% more energy efficient.
- Installing an on-demand unit at each hot water faucet gives an energy savings of 27% to 50%.
Read more: http://www.houselogic.com/home-advice/water-heaters/tankless-water-heater-right-you/#ixzz1dPb6WNbp
Friday, November 11 2011
Installing a wood-burning, gas-burning, gel-fuel, or electric fireplace to your house costs $400 to $10,000, depending on the type of fireplace you select.
Installing a fireplace with a brick-lined hearth and a custom mantel can easily cost $10,000 or more. It’s also possible to get a similar look for thousands of dollars less. Just shop for a ready-made unit and watch what you spend on the fireplace surround.
If your budget is really tight, a free-standing gel-fuel or electric fireplace eliminates installation costs. But be aware that some bare-bones alternatives don’t completely succeed in mimicking a real wood fire.
Check local building codes for possible restrictions on the types of fireplaces that can be installed in your area.
Costs of a wood-burning fireplace
An open-hearth, wood-burning fireplace—like the ones you see in mountain resort hotels—requires the help of a skilled, professional mason and a budget approaching (and often exceeding) $10,000.
For an existing home, considerable renovation work is required, including a foundation to carry the weight of the firebox and chimney, and the cost of the chimney itself.
Expect to pay $7,000 to $10,000 or more.
- Cost saver tip: Go for a drywall surround and a simple, wall-mounted mantle.
Costs of a gas-burning fireplace
A fireplace unit that burns natural gas or propane runs about $2,000 for the basic materials package. Installation and finishing typically add $2,500.
- Cost saver tip: Switch to a simpler surround and mantle, and get a direct-vent fireplace so you don’t need a chimney. Or, opt for a vent-free gas fireplace for $400 or so. Hiring a professional to install a gas line or a connection to a propane tank adds about $1,000.
Your least-expensive option
A gel-fuel fireplace or an electric fireplace starts under $400. With a portable unit, that’s the total cost since the fireplace is ready to use once you remove the packaging.
Because there’s no flue or chimney, it’s easy to install TVs or other electronic gear directly above an electric fireplace. If you include a mantel package, expect to pay $800 to $1,600. One perk available: sound effects that mimic the crackle and pop of a real fire.
Ongoing costs
Estimate your energy costs by using a fuel cost comparison calculator. Gel fuel, not included in the calculator, costs $3 per 13-ounce can, enough for three hours.
For a wood-burning fireplace, figure on $100 to $200 a year for chimney cleaning. Gas fireplaces need an annual service check ($100 to $150) plus a chimney inspection. Gel-fuel and electric fireplaces don’t need regular maintenance.
Tax credits for fireplace inserts
Through Dec. 31, 2011, you may qualify for a federal tax credit for up to $300 in costs, if you install a biomass (wood-or pellet-burning) fireplace insert that’s at least 75% fuel-efficient.
Read more: http://www.houselogic.com/home-advice/fireplaces-chimneys/fireplace-addition-costs/#ixzz1dLQ7Xywj
Wednesday, October 19 2011
Besides the annual inspection and sweep for your chimney, improve the function of your wood fireplace with responsible use.
Ready for the colder months? You will be if you follow these simple guidelines to keep your wood fireplace burning brightly—and safely.
1. Only burn dry, cured wood—logs that have been split, stacked, and dried for eight to 12 months. Cover your log pile on top, but leave the sides open for air flow.
Hardwoods such as hickory, white oak, beech, sugar maple, and white ash burn longest, though dry firewood is more important than the species. Less dense woods like spruce or white pine burn well if sufficiently dry, but you’ll need to add more wood to your fire more often, according to the Chimney Safety Institute of America (CSIA).
2. Burn firewood and only firewood! Crates, lumber, construction scraps, painted wood, or other treated wood releases chemicals into your home, compromising air quality. Log starters are fine for getting your wood fireplace going, but they burn very hot; generally only use one at a time.
3. Close the damper when not using your wood fireplace to prevent warm indoor air—and the dollars you’re spending to heat it—from rushing up the chimney.
4. Keep bifold glass doors open when burning a fire to allow heat to get into the room. On a factory-built, prefab wood fireplace with a circulating fan, keep doors closed to prevent unnecesary heat loss.
5. Have a chimney cap installed to prevent objects, rain, and snow from falling into your chimney, and to reduce downdrafts. Caps have side vents so smoke escapes. A chimney sweep usually provides and can install a stainless steel cap, which is better than a galvanized metal one because it won’t rust. Caps cost $50 to $200.
6. Replace a poorly sealing damper to prevent heat loss. A top-mounted damper that also functions as a rain cap provides a tighter closure than a traditional damper for your wood fireplace.
7. Install carbon monoxide detectors and smoke detectors in your house—near your wood fireplace as well as in bedroom areas.
8. Get your chimney cleaned twice a year if you burn more than three cords of wood annually. A cord is 4 feet high by 4 feet wide by 8 feet long, or the amount that would fill two full-size pickup trucks.
9. To burn a fire safely, build it slowly, adding more wood as it heats. Keep the damper of your wood fireplace completely open to increase draw in the early stages. Burn the fire hot, at least occasionally—with the damper all the way open to help prevent smoke from lingering in the fireplace and creosote from developing.
Read more: http://www.houselogic.com/home-advice/fireplaces-chimneys/wood-fireplace-9-tips-safety-and-efficiency/#ixzz1aaAPwOVL
Tuesday, October 18 2011
Inspect windows and doors regularly to stop air leaks and water seeps that create high energy and repair bills. We’ll show you how.
Take a look at windows, doors and skylights to stop air leaks, foil water drips, and detect the gaps and rot that let the outside in and the inside out. You can perform a quick check with a home air pressure test, or do a detailed inspection. Luckily, these inspections are easy to do. Here’s how to examine the barriers that should stand between you and the elements.
Big picture inspection
A home air pressure test sucks air into the house to reveal air leaks that increase your energy bills. To inspect windows and other openings:
- Seal the house by locking all doors, windows, skylights, and shutting all vents.
- Close all dampers and vents.
- Turn on all kitchen and bath exhaust fans.
- Pass a burning incense stick along all openings—windows, doors, fireplaces, outlets—to pinpoint air rushing in from the outside.
Windows and the outside world
Air and water can seep into closed widows from gaps and rot in frames, deteriorating caulking, cracked glass, and closures that don’t fully close.
To stop air leaks, pinpoint window problems.
- Give a little shake. If they rattle, frames are not secure, so heat and air conditioning can leak out and rain can seep in. Some caulk and a few nails into surrounding framing will fix this.
- Look deep. If you can see the outside from around—not through—the window, you’ve got gaps. Stop air leaks by caulking and weather stripping around frames.
- Inspect window panes for cracks.
- Check locks. Make sure double-hung windows slide smoothly up and down. If not, run a knife around the frame and sash to loosen any dried paint. Tighten cranks on casement windows and check that top locks fully grab latches.
Door doubts
- Check doors for cracks that weaken their ability to stop air leaks and water seeps.
- Inspect weather stripping for peels and gaps.
- Make sure hinges are tight and doors fit securely in their thresholds.
Inspect skylights
Brown stains on walls under a skylight are telltale signs that water is invading and air is escaping. Cut a small hole in the stained drywall to check for wetness, which would indicate rot, or gaps in the skylight.
To investigate skylight leaks, carefully climb on the roof and look for the following:
- Open seams between flashing or shingles.
- Shingle debris that allows water to collect on roofs.
- Failed and/or cracked cement patches put down the last time the skylight leaked.
|
|
|